By Joe Thompson, Certainteed
Base Flashing on a Parapet Wall
The intersection between your roof and adjoining parapet walls present opportunities for leakage. These vertical plane intersections require a base flashing to defend against rain and control the flow of water. It’s important to secure the junctures of your roof surface and a parapet with materials that will stay watertight.
Read on to learn how to install base flashing on a parapet wall, including inside and outside corners.
We’ll start with step-by-step instructions for installing base flashing on a parapet wall using CertainTeed Flintlastic® SA Self-Adhered Membranes.
CertainTeed Products Used:
• Flintlastic SA Cap
• Flintlastic SA Plybase
• Flintlastic SA MidPly
• FlintEDGE® Coping
• Flintlastic SA NailBase
• FlintBond® Trowel or FlintBond Caulk
Steps to install base flashing on a parapet wall using CertainTeed Flintlastic SA Self-Adhered Membranes:
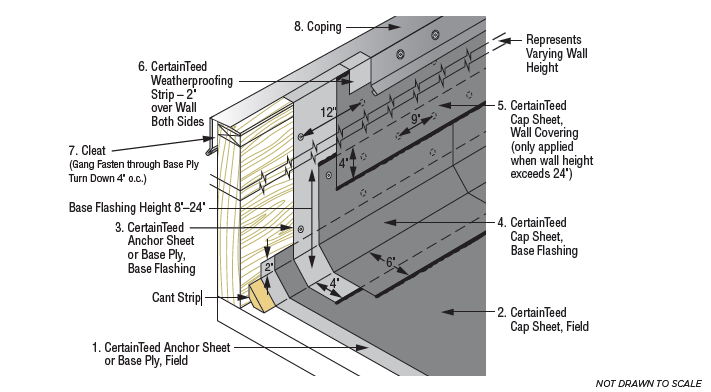
1. A proper base flashing detail actually starts in the field. Terminate your field membrane a minimum of 2” above the cant.
2 . Then, on a maximum wall height of 24”, start your anchor or base ply turned over the outside edge of the wall by 2” and extended into the field 4”, overlapping any base flashing already in place by 4”.
3 . Nail that off with standard metal cap nails, 4” on center on the outside edge, with a minimum of 4 fasteners in any laps, and 12” on center in the field of the wall.
4 . When working with Flintlastic SA Self-Adhered Membranes, where the base flashing overlaps the granulated cap sheet in the field, apply FlintBond SBS-Modified Adhesive – Trowel or Caulk Grade – to ensure a long-term bond.
5 . Your cap flashing terminates at the top edge of the wall and extends 2” beyond the base in the field.
6 . Even though the membrane is adhered, nail off the top edge using metal cap nails every 9” on center to prevent vertical slippage.
7 . Again, where the cap overlaps the granulated surface in the field, apply FlintBond SBS-Modified Adhesive – Trowel or Caulk Grade. Note that adhesive is not applicable for torch-applied systems.
8 . Seal the top edge off with a bead of FlintBond Caulk.
9 . To prevent any granule contact with the underside of the metal, install a field-cut, smooth-surfaced weatherproofing strip turned down 2” on both the inside and outside of the wall. In this detail, I’m using Flintlastic SA PlyBase.
10 . Last step is to install your FlintEdge Coping per published application instructions.
Learn how to install inside and outside corners for base flashing on a parapet wall with step-by-step instructions using these products:
CertainTeed Products Used:
• CertainTeed Flintlastic SA NailBase
• CertainTeed Flintlastic SA Cap
• CertainTeed FlintBond
Base Flashing Inside & Outside Corners
Base Flashing an Inside Corner
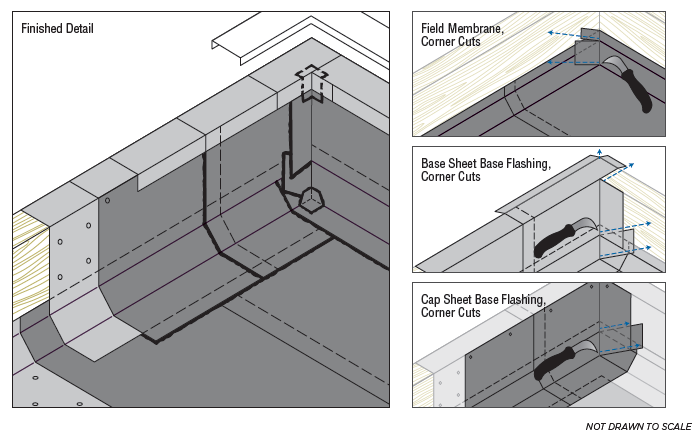
1 . When putting your field membrane in place, make relief cuts in all roofing layers to allow the membrane to take the shape of the corner.
2 . Starting with your backer sheet, make relief cuts to accommodate the top edge downturn and the corner.
3 . For the downturn, make a straight cut perpendicular to the wall out. For the corner, make a straight cut parallel to the wall out. The sheet will now drop into place.
4 . At the bottom of the corner, the sheet will flex to indicate where the relief cuts are needed to accommodate the top and bottom of the cant. Mirror and repeat these steps on the adjacent wall. Make sure to round off your cuts.
5. When applying your cap flashing, no cut is necessary on the top of the corner, but similar relief cuts are required at the bottom corner. Mirror those cuts on the adjacent wall. Make sure to round off your cuts.
6. FlintBond is required anywhere an overlap occurs onto a granulated surface – but is not applicable for torch-applied systems.
7. To ensure the bottom of the corner is watertight, affix one patch in FlintBond where the corner cut was made. CertainTeed does not dictate the shape of the corner patch.
Base Flashing – Outside Corner
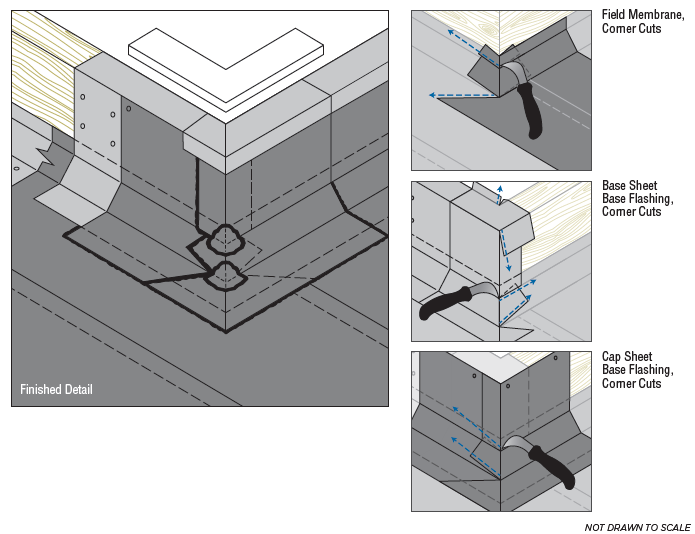
1 . First, when putting your field membrane in place, make relief cuts in all roofing layers to allow the membrane to take the shape of the corner.
2 . Starting with your backer sheet, make relief cuts to accommodate the top edge downturn and the corner.
3 . For the downturn, cut on an angle from the wall out. For the corner, make a straight cut – parallel to the wall out. The sheet will now drop into place.
4 . At the bottom of the corner, make a straight cut from the top of the cant and from the bottom of the cant on an angle. Mirror and repeat these steps on the adjacent wall. Make sure to round off your cuts.
5 . When applying your cap flashing, no cut is necessary on the top of the corner, but similar cuts are required at the bottom corner. Mirror those cuts on the adjacent wall. Make sure to round off your cuts.
6 . FlintBond is required anywhere an overlap occurs onto a granulated surface – but is not applicable for torch-applied systems.
7 . And then lastly, to ensure the bottom of the corner is watertight, affix two patches in FlintBond where the corner cuts were made. CertainTeed does not dictate the shape of the corner patches.