How the pros do it—The first step-by-step installment of a 5-part flashing series
When thinking of pipes, the first thing that probably comes to mind is plumbing inside wall cavities of a building or home. However, pipes are also commonly found protruding from a rooftop—penetrations made through the roof to allow pipes to vent noxious gases and odors from equipment in the building or home into the air. Pipes can also help bring air in and out of a building or home to keep it properly ventilated.
Pipes are vital to a building’s health, but it is also critically vital to properly flash or waterproof the pipe penetration to prevent moisture and water incursion into the structure. As many home or building owners are painfully aware, unwanted or uncontrolled moisture can cause damage to people and/or property, and lead to mold growth that requires expensive and time-consuming remediation efforts.

Steps to flash a pipe
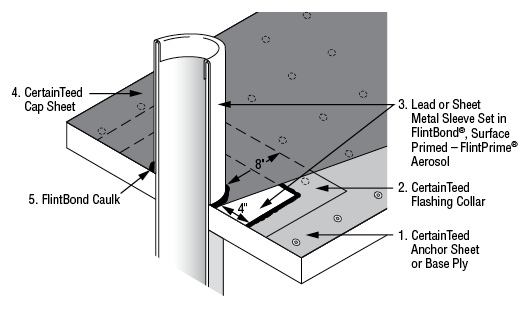
Using CertainTeed SmartFlash ONE; CertainTeed Flintlastic SA Cap; and CertainTeed Flintlastic SA NailBase:
1. First, get your field membrane in place, cutting a hole to accommodate the pipe.
2. When you’re ready to flash in, start by roughing up the pipe.
3. Then, prepare the polyester fabric reinforcement. Wrap the fabric around the pipe, measuring with a 2″ overlap.
4. Once you have that cut, cut “fingers” into the bottom half of the fabric. This will allow the fabric to radiate around the pipe.
5. Next, we need our target patch, which will sit on top of the fingers. You’ll take 6″ on each side, overlapped by 2″ in the middle. Simply cut out fabric to accommodate the pipe.
6. You can tape off the edges and pipe approximately 1″ beyond the reinforcement. This allows for a clean finish. Now we’re ready for resin.
7. SmartFlash ONE is thick and can be applied easily with a brush or roller without dripping. First, apply the resin around the pipe and onto the base at approximately 30 wet mils thick.
8. Then, lightly press in your finger flashings.
9. Now fully cover the fabric with resin, making sure to put resin in the 2″ overlap. You should not see any fabric.
10. Next, press in your target patch. Again, fully coating the surface and overlapping area with resin.
11. For full warranty coverage up to 20 years, give this between 2 to 4 hours to dry and then come back with a final coat that is approximately 30 wet mils thick.
12. While not required for warranty, but if desired for aesthetics, broadcast CertainTeed color-matched granules into the wet resin.
For a video by CertainTeed’s Joe Thompson that includes these step-by-step instructions, visit blog.certainteed.com and search for “Joe Knows.”